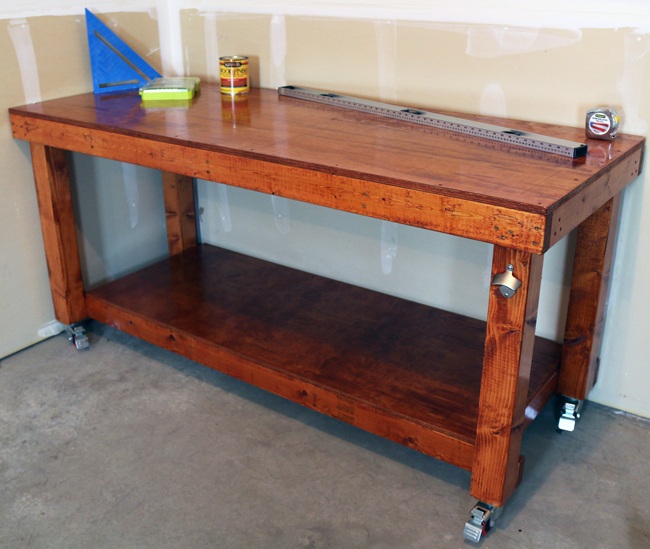
For this week's tutorial, I help my good friend George build a DIY simple workbench for his new home. He has been wanting to get into DIY projects and needed a workbench to get started on projects, in his garage. We made this diy workbench simple, yet very functional and sturdy workbench to put in his garage. This is a fun diy workbench build and is very affordable to make. Be sure to check out the video tutorial below and the free, downloadable woodworking plans here. Best of luck on yours!
DIY Workbench Tools Needed
Circular Saw OR Miter Saw
Drill
And/OR Impact Driver
Orbital Sander– Ryobi makes a nice one.
Tape Measure, Straight Edge, Pencil
Eye and Ear protection
DIY Workbench Supplies Needed
Lumber for the DIY workbench – see wood list below
Minwax Polyurethane
Minwax Gunstock Stain
Caster Wheels
Sandpaper, Wood Screws, and Washers
Approximate Total Cost: $175
This simple DIY Workbench can be made for about $175 in materials cost. You could reduce $35 right off the cost by only using one sheet of plywood and changing dimensions of the top to 24” or less in width.
Wood Costs
- 2 – 4x4s $10/piece
- 7 – 2x4s $2.50/piece
- 2- Plywood sheets $35/piece
Other Supplies
- 4 – 4” Caster wheels $8/piece
- 1 lb. – 2 ½” Screws $9/pound
- 1 lb. – 1 ¼” Screws $9/pound
- Stain – $8/quart
- Polyurethane – $12/quart
- Washers – For Caster Wheels $1
This is the cost for the wood, wood finish, and other basic supplies. *Note: This doesn’t include smaller things you may already have around the shop, including: glue, sandpaper, etc.
Cut All of the Wood Pieces
We'll start this DIY workbench project by marking and making cuts for all of the different pieces for this simple workbench. We used a simple circular saw for this, you can use a miter saw or table saw as well. Once all of your cuts are made, we’ll give all of the boards a quick sanding and then start assembling it. Refer to the free, downloadable plans for the cut list.

Start Assembly, Making the Top First
Now we’ll start assembling our simple workbench. After you’ve cut all of the pieces according to the cut list in the plans, then grab the legs, the top lengthwise supports, and the top stretcher supports. Center one of the top stretcher supports and then space the others about 18” apart. Let's put this all together with 2 ½” wood screws. Pre drill any holes before adding the wood screws and assemble it all together.
Assemble the Bottom
With very similar assembly construction as the top portion, let's attach the bottom support. Note that the back side lengthwise board of the bottom (bottom lengthwise board that will face the user) is attached inside the legs. This allows for more room for the user of the workbench. Screw this all together, similar to before, just with a slight variation in construction design. Refer to the video for more visual insight into this. Attach your caster wheels at this point as well, adding a washer on top of the screws to ensure a secure hold.
Cut the Plywood and Attach
Now, we simply need to cut the plywood top and bottom pieces to size. Refer to the cut list for the dimensions and make your cuts. We’ll attach these with 1 1/4″ wood screws, always pre-drilling the holes. You can be generous with the amount of screws that you put into these boards.
Stain and Finish the Workbench
My friend George was a big fan of Minwax’s Gunstock Stain, so that is the color that we went with for his workbench. Always test the stain on a scrap piece of wood before applying to the whole project. Be sure to thoroughly cover all of the wood’s surface, working your way around, underneath, and in all of the nooks and crannies of your workbench. Let this stain dry and cure and then add a clear coat of polyurethane or lacquer to the workbench.
Get to Work!
Now you’ve got a solid workbench to get to work on! I hope you’ve enjoyed making this simple DIY project and that you’ll continue to make many more projects in the future. Best of luck and thanks for checking this post, video, and plans out! Cheers


